Note Binder:
March 12, 2022
Content:
2.4) Section Groups (Subdirectories)
3.2.2) Notebook List Information
3.4.5) Section Group Properties
3.5.1) Default Notebook Location
3.5.2) General Settings Config File
3.5.3) Application Launcher Config File
3.5.4) Open Notebook List Config File
3.6) Application Launchers Function
3.6.1) Add Application Launcher
3.6.2) Edit Application Launcher
Summary
The Note Binder is a Note Organizing program designed to keep notes well organized. The reason for me to design this note organizing program is to create a note organizing program that can also launch different applications.
Note Binder Concepts:
Notebooks: Directories containing a collection of files/notes/Sections and directories/Section Groups.
Section Groups: Subdirectories within Notebooks, useful for grouping Notes together into different categories.
Sections: Files within Notebooks, these are the notes themselves and they can be launched through Application Launchers
Application Launchers: A list of launchers that allow the user to open Sections in applications.
Note Binder Issues:
Crash on Startup (X.Org): Crashes on Startup in X.Org. Runs well in QtCreator or in Wayland session.
Duplicate Items: If an item from a Notebook/Section Group is copied to a different Notebook/Section Group but the different Notebook/Section Group already
Crash via Endless Recursion: Files within Notebooks, these are the notes themselves and they can be launched through Application Launchers
The Source Code is at: https://gitea.drewtechs.net/DrewTechs/Notebinder/
1) Introduction
1.1) What is the Note Binder?
The Note Binder is a Note Organizing program designed to keep notes well organized. With the way this application functions, one could also call it a file manager, though there are far more robust file managers out there to use and this isn't a good substitute for this. This program is geared towards organizing information and being able to manage them more easily.
This is not a note taking application however, there is no method of creating new notes from scratch within the program and relies on external applications for actual note taking. This program does have a mechanism to handle application launching (See Sections 2.6 and 3.6)
1.2) Why use the Note Binder?
As mentioned in Section 1.1, the function of this program is to keep notes organized, and this application is the right tool for the job as it is able to organize files of different file types as well. Not only can it organize the notes but it can also open a application to modify those notes or read them so it's also a note opener as well. This makes the Note Binder a powerful tool for organizing notes and can be used indirectly to create new notes as well.
2) Note Binder Concepts
2.1) Notebooks

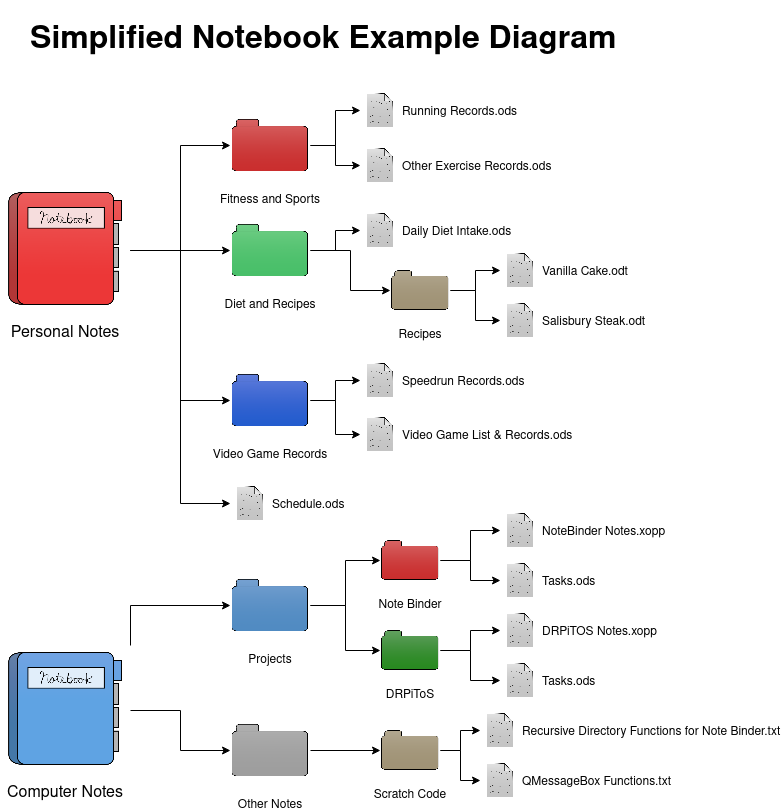
Notebooks in the context of this program are a collection of notes (Sections) and subdirectories (Section Groups) wrapped in a directory. Notebooks cannot contain themselves (it is not recommended to create Notebooks within Notebooks) as they are the top directory of a note collection.
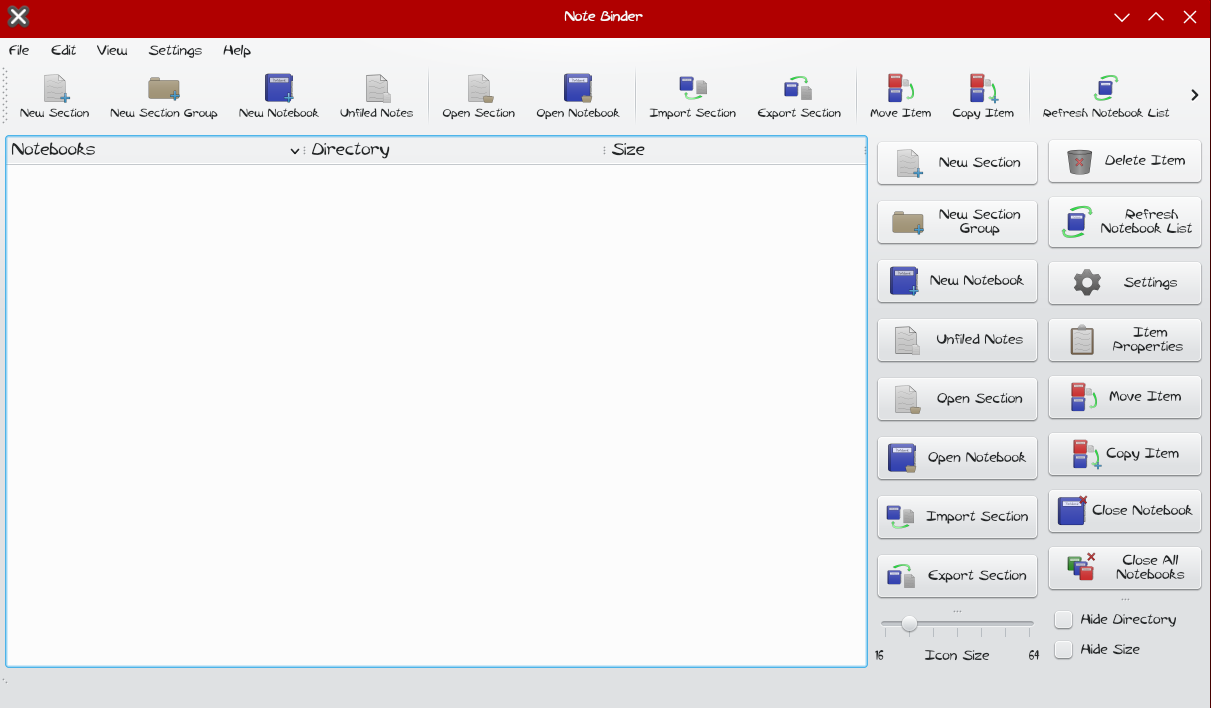
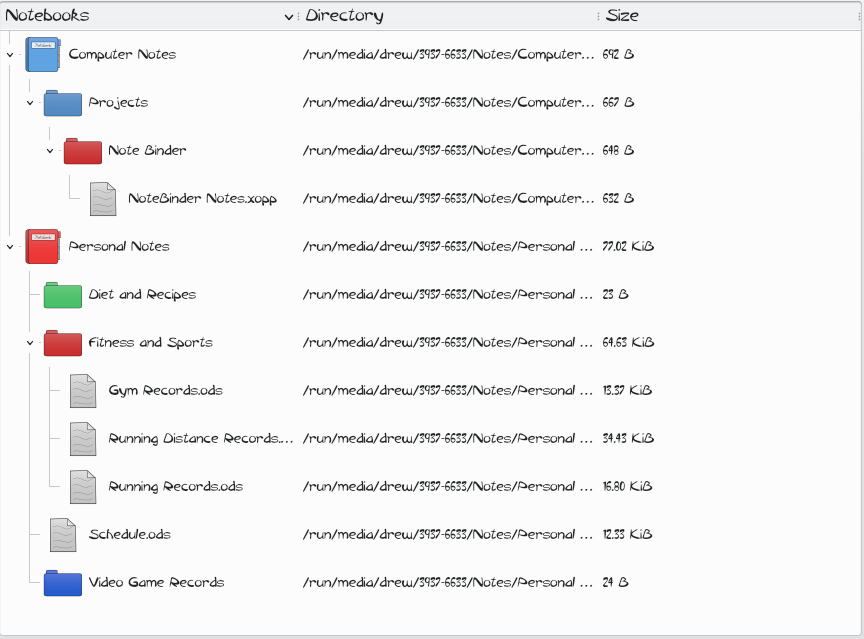
The Notebooks for example can each be used for a separate category of notes (In the example diagram, one notebook contains personal information and the other notebook contains computer notes). The notebook shown on the screenshot is an example of what the notebook would look like on the list (a blank notebook with no Sections nor Section Group. Notebooks have many different color icons to pick from.
2.2) Notebook List

At the start of the program, the first thing the user will see is a Notebook List. If the application was previously opened and some notebooks were opened when the program closes, the NoteBinder application will reopen those notebooks on startup if they aren't closed before quitting the application. The notebooks never stay closed until the user closes it.
On the main window there is the option to change the icon size of the items within the NotebookList from 16px (16x16) to 64px (64x64) via slider. There is also the option to hide the directory and file size of the notebooks if the user wants to save space on their window. Once the program is closed these settings will be saved and reloaded when the program restarts.
2.3) Sections (Files)

In this application, the terms Sections, Files and Notes are essentially interchangeable, meaning that the sections are files and are treated as such. The only exception is each Notebook contains a "notebook.noteb" file and each Section Group contains a "sectiongroup.sectgr" file and those files are excluded from the list of Sections/Notes inside the notebook (as in they are not displayed). Backup files are excluded as well (demonote.xopp~ doesn't count while demonote.xopp does since demonote.xopp~ is a backup file while demonote.xopp is a normal file).
2.4) Section Groups (Subdirectories)

Section Groups are subdirectories within Notebooks. These are very useful for grouping notes together. Much like Notebooks there is a color option for Section Groups as well. Unlike Notebooks, Section Groups can contain Section Groups in upon itself recursively.
2.5) Settings Configuration
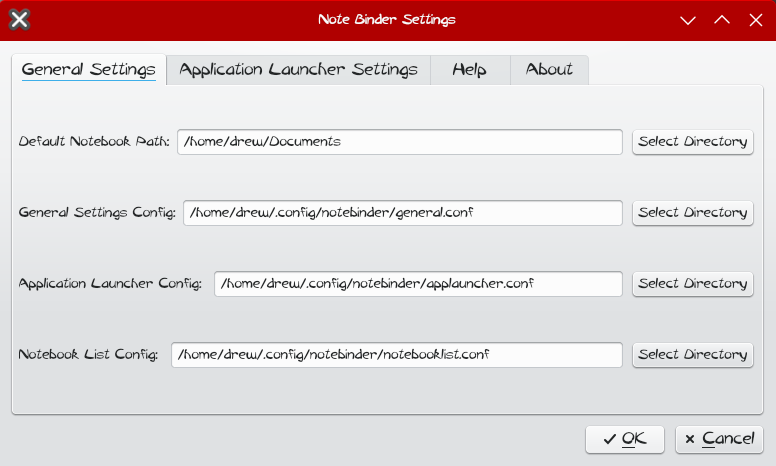
There are some settings to configure the application and where the configuration files themselves will be stored (except for the default settings.conf file which is fixed at $HOME/.config/notebinder). These settings are optional and is recommended to keep them at their default.
2.6) Application Launchers

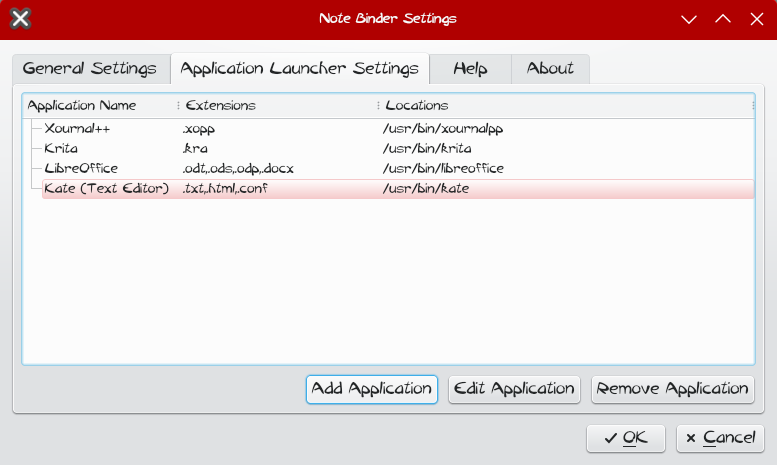
In the settings window there is a setting to configure Application Launchers for different file types. This is essential for opening Sections. By default this list is blank. It is up to the user to enter which applications to support for file launching.
3) Note Binder Functions
Here is a list of the program's functions:
3.1) Notebook Functions
3.1.1) New Notebook
To create a new Notebook, click on the New Notebook button and a dialog will appear.
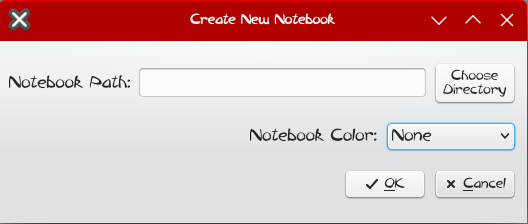
To create a New Notebook, enter the path of the notebook including the name. This can also be done by clicking on the Select Directory button to open up a save file dialog to choose where to save the Notebook.
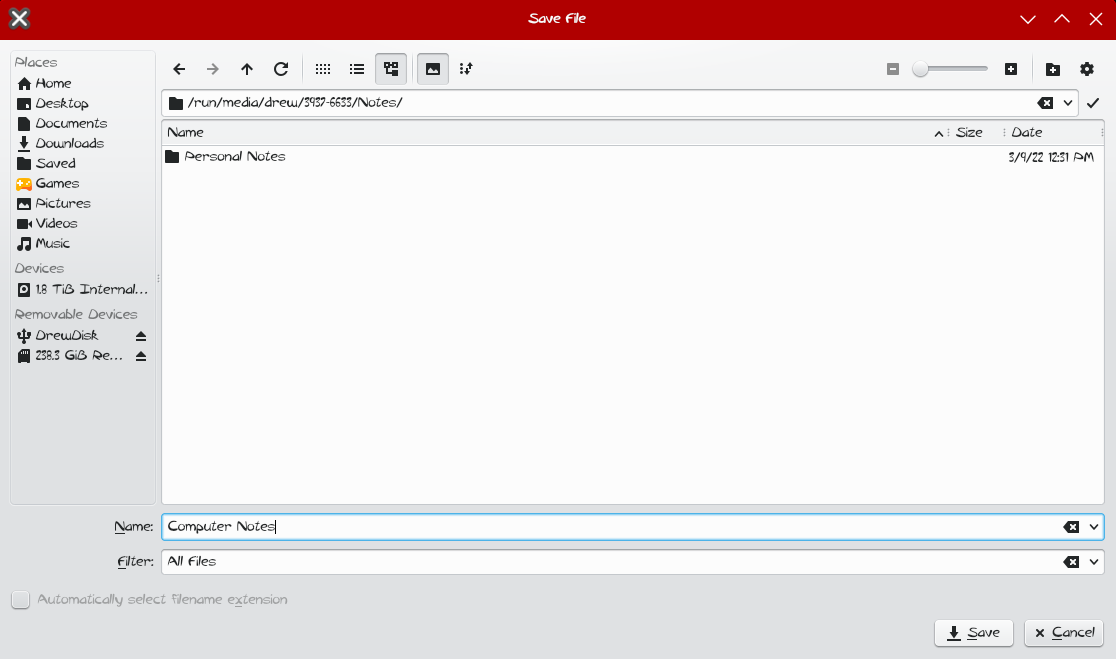
Once entered you can select a color for the Notebook. Having notebooks colored makes it visually easier to see the difference between a couple of notebooks. This part is optional however and can be left as the default color (None/White).

Click Ok for the program to create a new Notebook with those parameters. The user should then see the notebook created on the list and the notebook location is shown in the Location column so the directory does exist.

3.1.2) Open Notebook
To open an existing Notebook, click on the Open Notebook button and a file dialog will appear.
To find a valid Notebook, find a notebook.noteb file that is located within the directory. The parent directory of that file will be the Notebook itself and by opening this file will open up the whole directory and subdirectory.
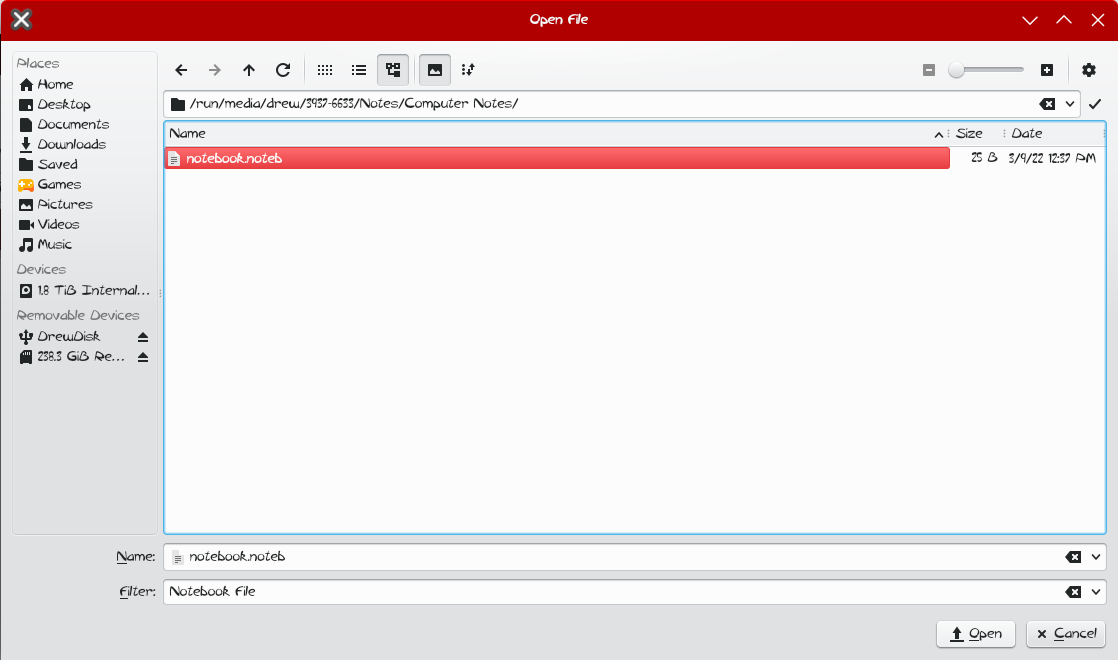
To create a New Notebook, enter the path of the notebook including the name. This can also be done by clicking on the Select Directory button to open up a save file dialog to choose where to save the Notebook.

3.1.3) Close Notebook
To close an opened Notebook, click the Notebook on the list to select it and then click on the Close Notebook button.
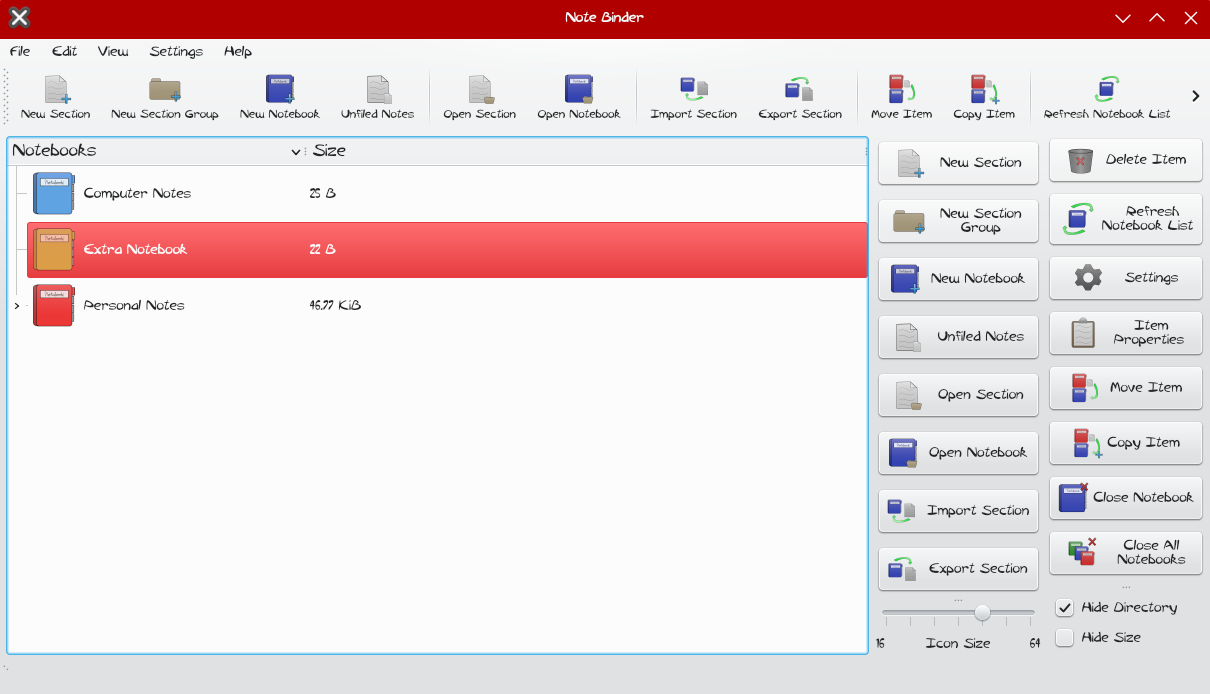
The Notebook will immediately close and be removed from the list. The Notebook will still exist on the computer and can be reopened by clicking the Open Notebook button.
3.1.4) Delete Notebook
To delete an opened Notebook, click the Notebook on the list to select it and then click on the Delete Item button. This will open up a prompt asking you if you really want to delete the Notebook, answer Yes and the Notebook and it's contents will be deleted. This may or may not delete it permanently (or move it to trash) depending on the operating system so if unsure, do not delete it.

The Notebook will immediately close and be removed from the list. The Notebook will still exist on the computer and can be reopened by clicking the Open Notebook button.
3.1.5) Notebook Properties
To check or modify the notebook, click the Notebook on the list to select it and then click on the Item Properties button. This will open up a prompt showing notebook information.
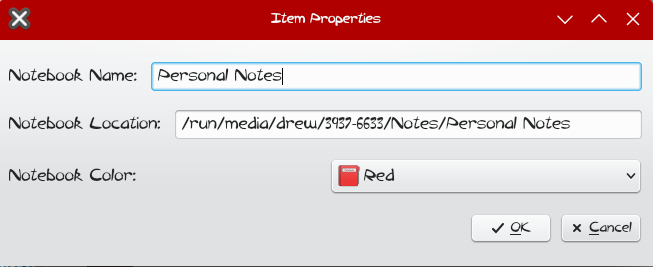
From here the Notebook name and Notebook color can be changed. To change the enter the new name in the Notebook Name field and click Ok and the new settings will be applied.
3.2) Notebook List Functions
3.2.1) Refresh Notebook List
To update the notebook list, click the Refresh Notebook List button and if any new files were added or removed, the notebook
From here the Notebook name and Notebook color can be changed. To change the enter the new name in the Notebook Name field and click Ok.
3.2.2) Notebook List Interface
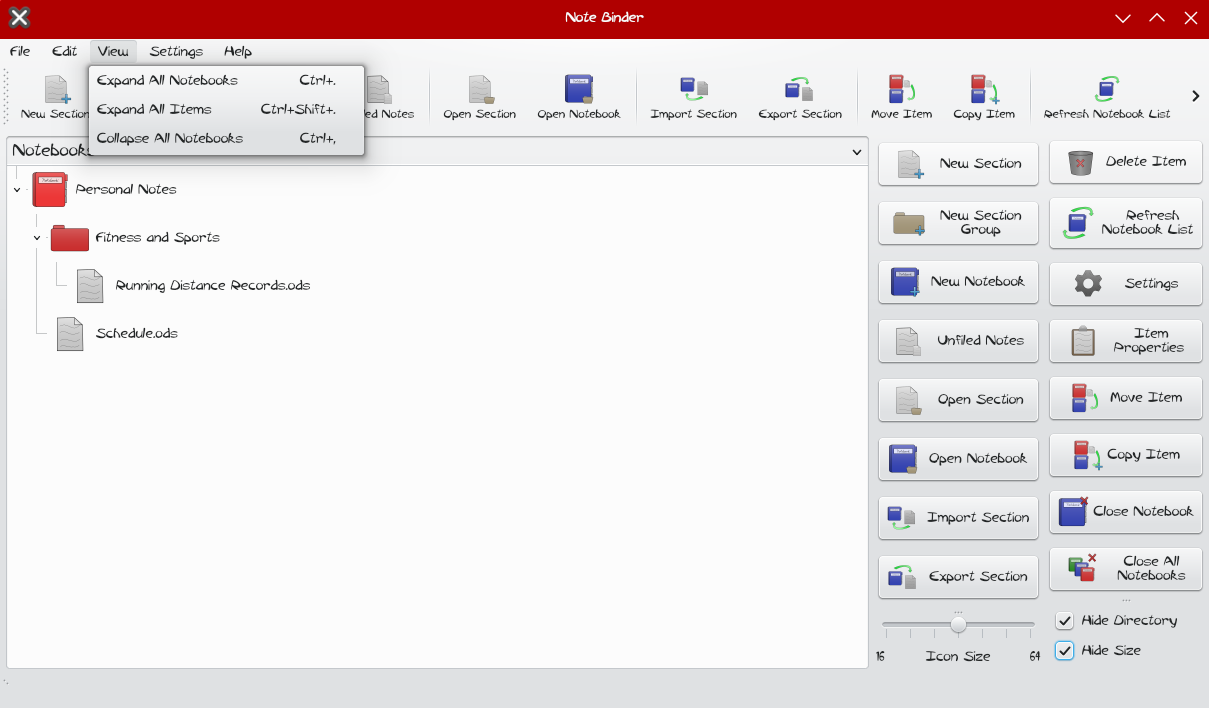
The main menu as mentioned has different options for viewing. Some options involve showing or hiding columns, adjusting icon sizes and expanding or collapsing notebook contents. Collapsing and expanding allows the user to access the information they need and hide information they don't. Notebooks and Section Groups support expanding and collapsing views.
On the menubar, click on view and the user can choose three different view options. One option is to Expand All Notebooks (which means expand every Notebook to show it's contents, but it does not expand Section Groups). Collapse All Notebooks condenses the Notebook List by hiding all of the Section Group and Files and Expand All Items expands every Notebook and Section Group within the Notebook, making it the most expansive option.
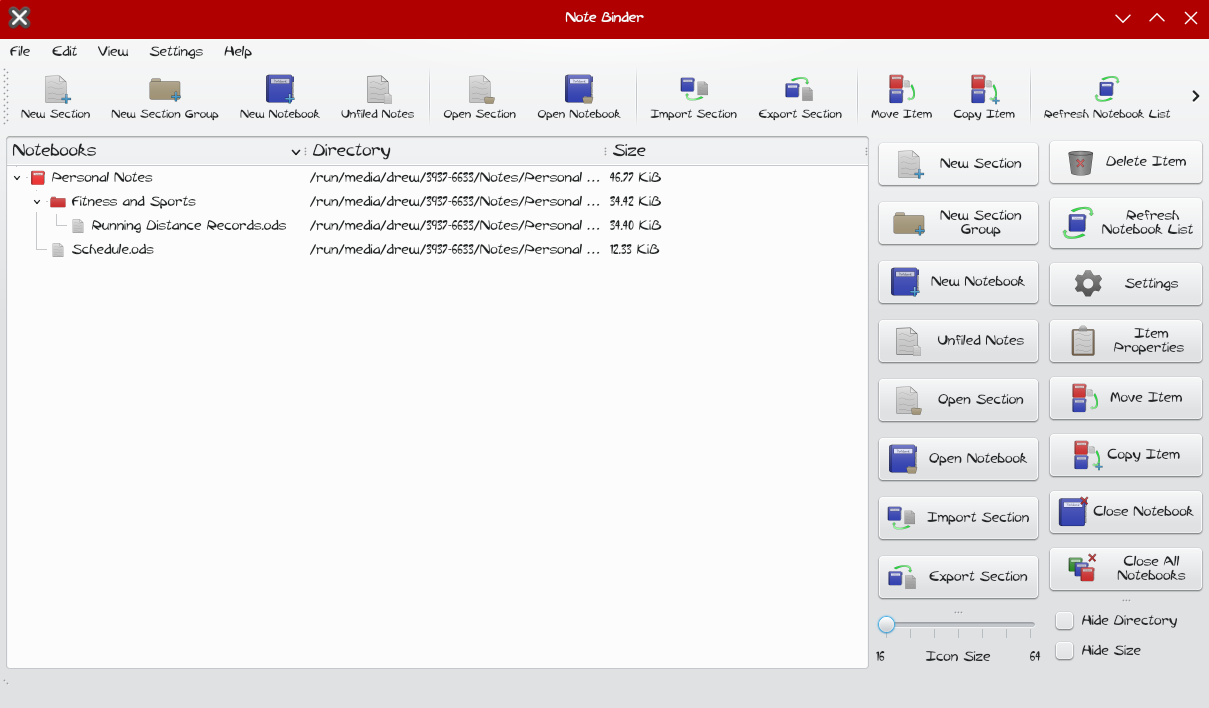
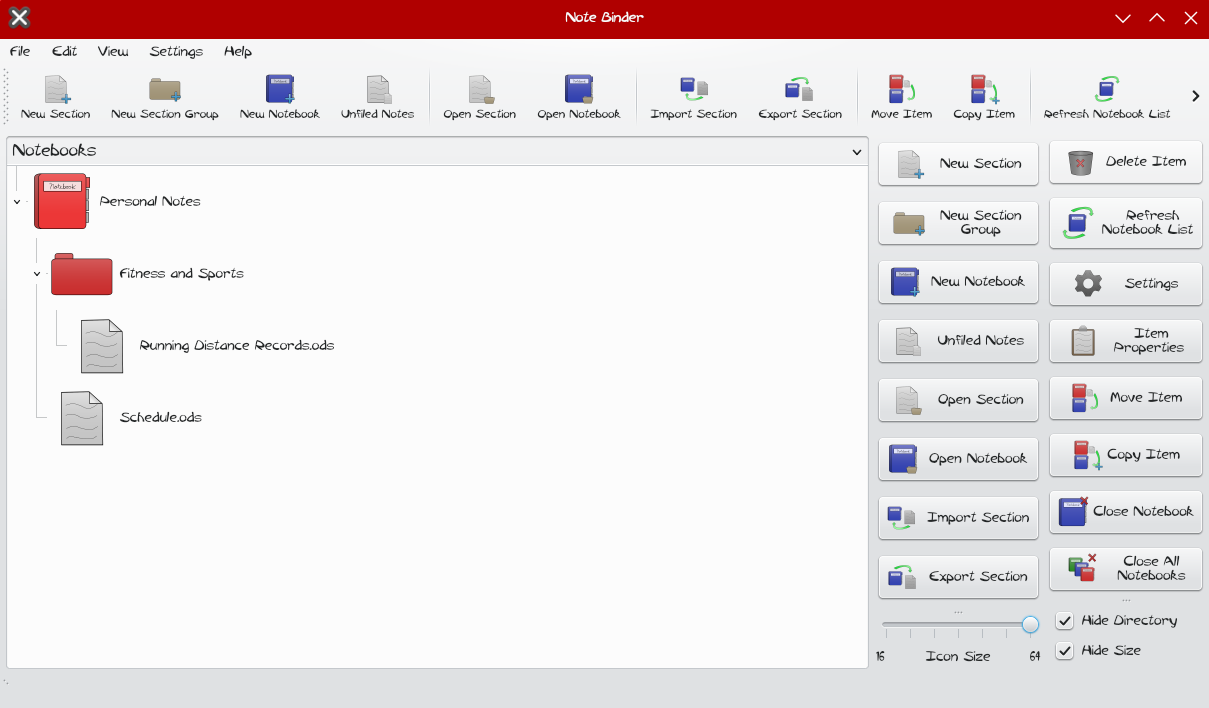
There is also the option to hide or show the Directories and Size of Sections, Section Groups and Notebooks and the option to change the icon size ranging from 16px (16x16) to 64px (64x64).
3.3) Section Functions
Sections are basically files that can be accessed through the Note Binder application. There are a wide range of functions to manage these files.
3.3.1) New Section
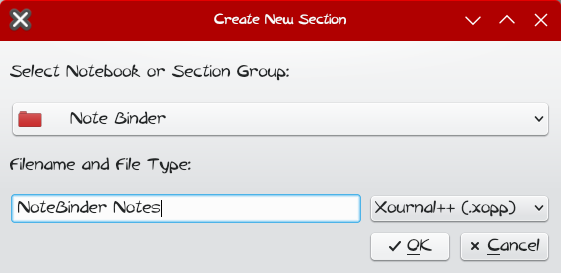
NOTE 1: To create a section, the user must have set up Application Launchers within the program to launch the application. The file extensions for the files can only be applied if the extension is on one of the Application Launchers.
NOTE 2: Some applications do not support directly creating new files through Note Binder's application Launcher (LibreOffice and Krita for example will not create a new file through this method though Xournal++ and Kate would). Even the programs that do support it, it is required to save the file and refresh the notebook list to see it appear.
To create a new Section, click the New Section button and a dialog for creating a New Section will appear. Select an opened Notebook or Section Group to create the New Section in. After clicking Ok, an application will be launched. The file will need to be saved within the application for the note to be created and the notebook list will need to be refreshed for it to appear.
3.3.2) Unfiled Notes
NOTE: To create a section, the user must have set up Application Launchers within the program to launch the application. The file extensions for the files can only be applied if the extension is on one of the Application Launchers.
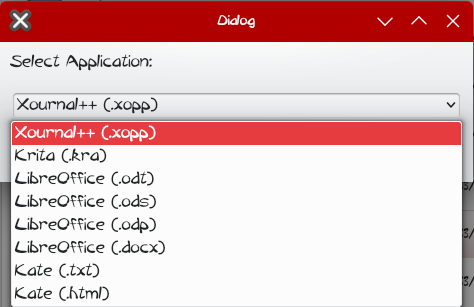
Some applications do not directly support opening a file that doesn't exist to then save and create a new file. For those applications Unfiled Notes can be used to startup an application. This can also be used to create notes outside the Notebook List. To create an Unfiled Note (or Unfiled Section), click on the Unfiled Notes button and a prompt will show up asking the user which application to start up to create a note with.
3.3.3) Open Section
NOTE: To open a section, the user must have set up Application Launchers within the program to launch the application.
To open a Section, select a Section within the Notebook List and click Open Section. If the file type is supported on the Application Launcher List (depends on user setup) then the application will start right up. The compatibility of this feature is greater than creating a new Section and can be used with file reading applications as well.
3.3.4) Delete Section
To delete a Section, the user must select the Section/File to delete it and then click on the Delete Item button. A prompt will show up asking if the user wants to delete it, if answered Yes, the file gets erased from the directory and removed from the Notebook. This may or may not delete the file permanently (or move it to trash) depending on the operating system.
3.3.5) Import Section
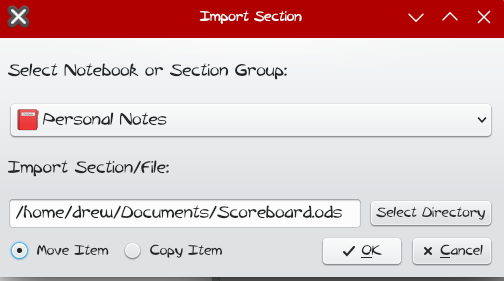
To import a Section/File to a Notebook, click on the Import Section button and a dialog will show up asking the user which directory to import it to and a Text Field telling the user what file to import. Use the Select Directory button to open up a File Dialog and find the file to import to the Notebook, the file can be of virtually any file type (though notebook.noteb and sectiongroup.sectgr files are not recommended at all). The last option is to whether move or copy the item from the directory. If the file is moved, then the imported file will no longer exist in the directory originally found, if not then the file is copied and the original is kept as well.
3.3.6) Export Section
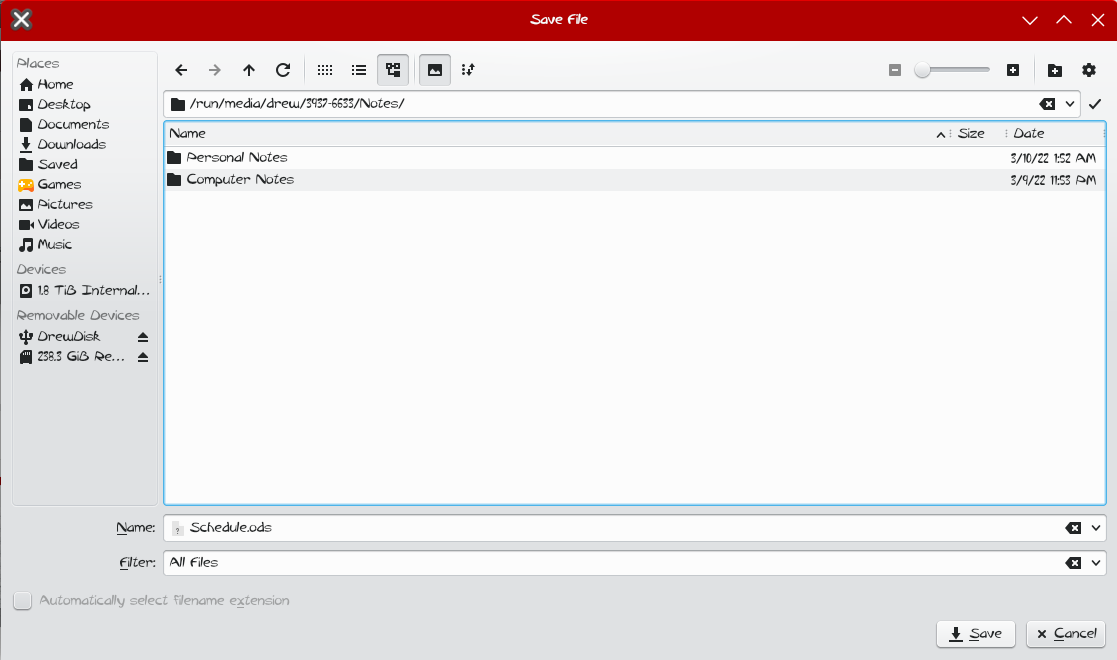
To export a Section/File (save it on the computer), select the file on the Notebook List to export, the click on "Export Section" button and a file dialog will show up. Select the directory to save the file in and the file name is by default on the File Text Field within the dialog but the file can have a different name. Then click Save and the file will be copied.
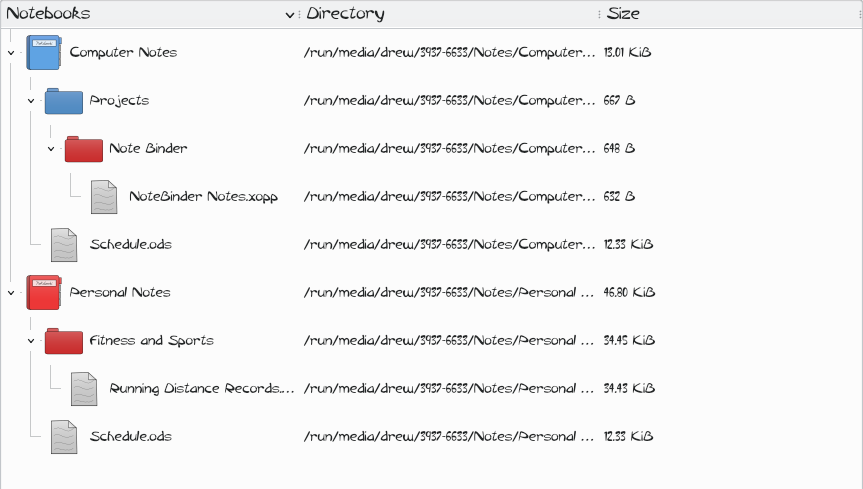
This is functionally same copying the file with the Copy Item button if the section was exported into a different part of a Notebook or another Notebook in the list. (See Section 3.3.7).
3.3.7) Copy Section
To copy a Section/File (save a copy to a different Notebook or Section Group), select the file on the Notebook List to copy, the click on "Copy Item" button and a Copy Section dialog will show up. Select the Notebook or Section Group to copy the Section into.
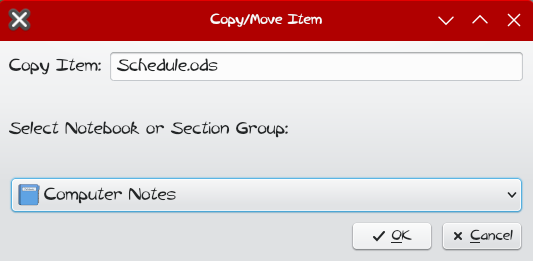
Then click Okay and the file will be copied to the selected Notebook/Section Group. If the file already exists, a prompt will ask if the user wants to replace the file.
3.3.8) Move Section
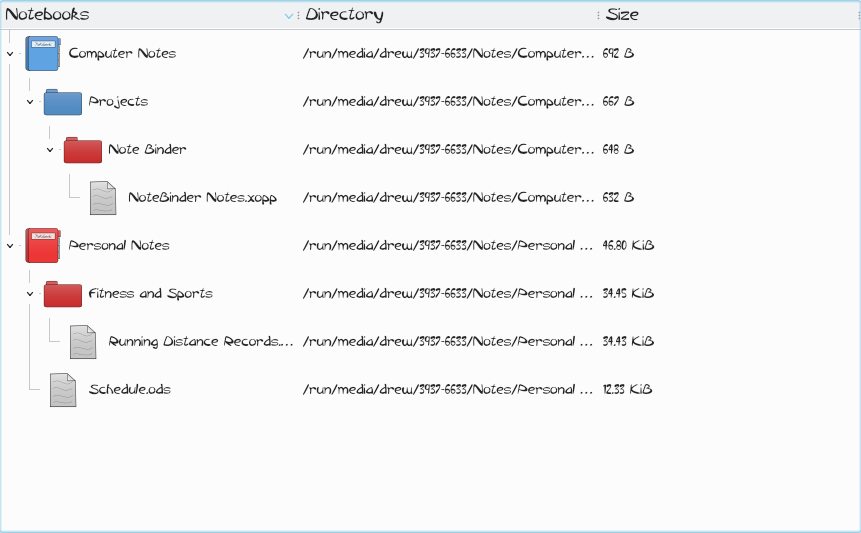
To move a Section/File (move Section to a different Notebook or Section Group), select the file on the Notebook List to copy, the click on "Move Item" button and a Move Section dialog will show up. Select the Notebook or Section Group to move the Section into.
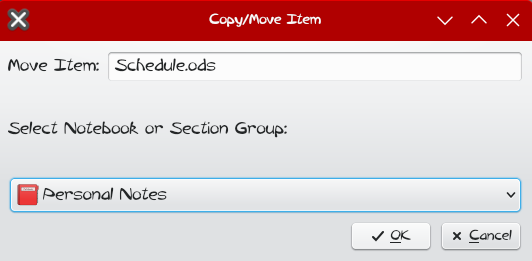
Then click Okay and the file will be moved to the selected Notebook/Section Group. If the file already exists, a prompt will ask if the user wants to replace the file.
3.3.9) Section Properties
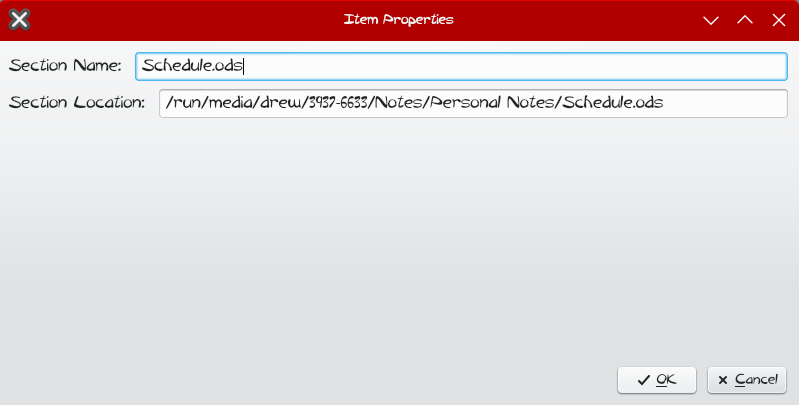
To check the properties of a Section, select a Section and click on Item Properties. From here you can see the directory the file is stored in as well as the file name. The file can also be renamed through this window.
3.3) Section Group Functions
Section Groups are subdirectories and can be treated as such, here are the functions to use for Section Groups
3.4.1) New Section Group
To create a new Section Group, click the New Section Group button and a dialog for creating a New Section Group will appear. Select an opened Notebook or Section Group to create the New Section Group in. Here the color of the Section Group can also be selected.
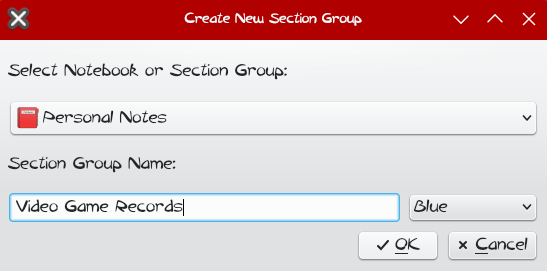
After clicking Ok, the new Section Group (directory) will be created in the selected Notebook/Section Group.

3.4.2) Delete Section Group
To delete a Section Group (and delete it's contents including sub-Section Groups and Sections within the selected Section Group), the user must select the Section Group/Directory to delete and then click on the Delete Item button. A prompt will show up asking if the user wants to delete it, if answered Yes, the file gets erased from the directory and removed from the Notebook. This may or may not delete the file permanently (or move it to trash) depending on the operating system.
3.4.3) Copy Section Group
To copy a Section Group/Directory (save a copy to a different Notebook or Section Group), select the Section Group on the Notebook List to copy, the click on "Copy Item" button and a Copy Section dialog will show up. Select the Notebook or Section Group to copy the Section into.
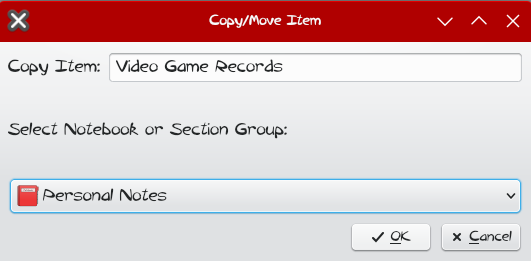
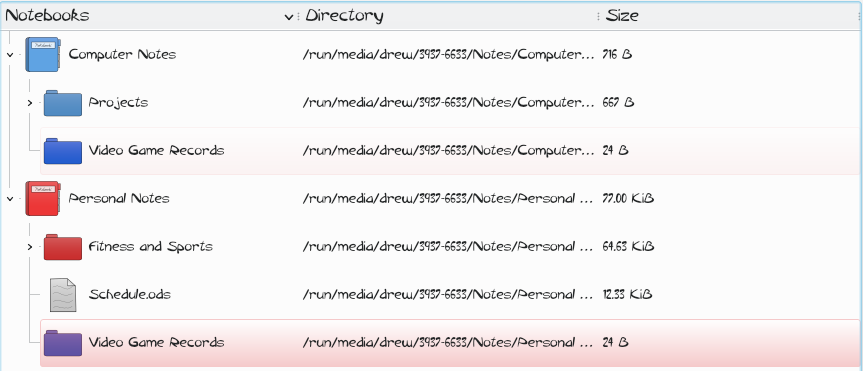
Then click Okay and the file will be copied to the selected Notebook/Section Group. If the file already exists, a prompt will ask if the user wants to replace the file.
3.4.4) Move Section Group
To move a Section/File (move Section to a different Notebook or Section Group), select the file on the Notebook List to copy, the click on "Move Section" button and a Move Section dialog will show up. Select the Notebook or Section Group to move the Section into.
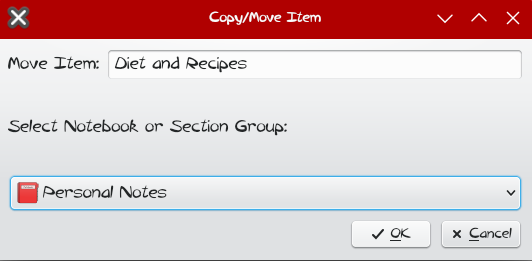
Then click Okay and the file will be moved to the selected Notebook/Section Group. If the file already exists, a prompt will ask if the user wants to replace the file.
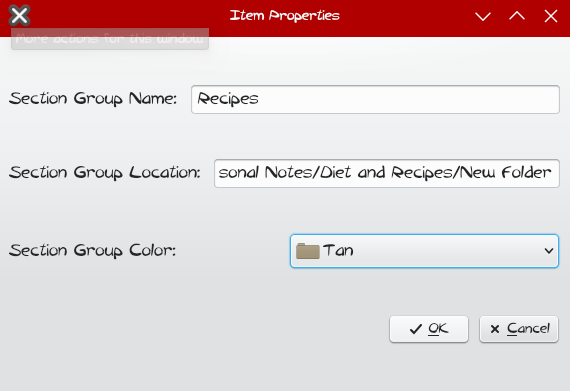
3.4.5) Section Group Properties
To check the properties of a Section Group, select a Section Group and click on Item Properties. From here you can see the directory the Section Group is stored in as well as the name. The Section Group can also be renamed through this window. The icon color for the Section Group can also be changed here as well.
3.5) Settings Functions
In Section 2.5 there is a list of settings that can be changed shown here, including config file locations. Though it's recommended to keep them at defaults they can be change. In my example here the Notebinder settings are stored inside a notebook, which is optional.
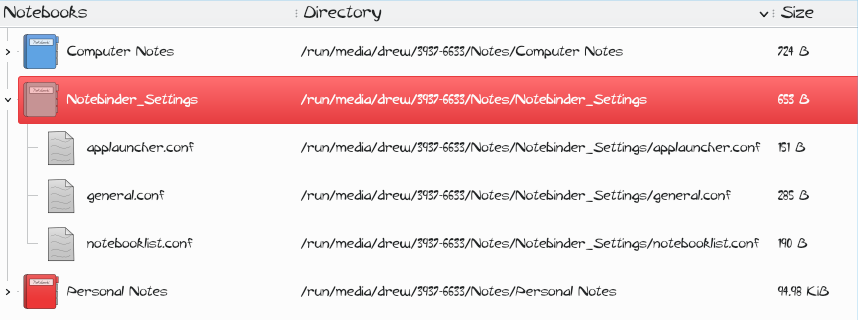
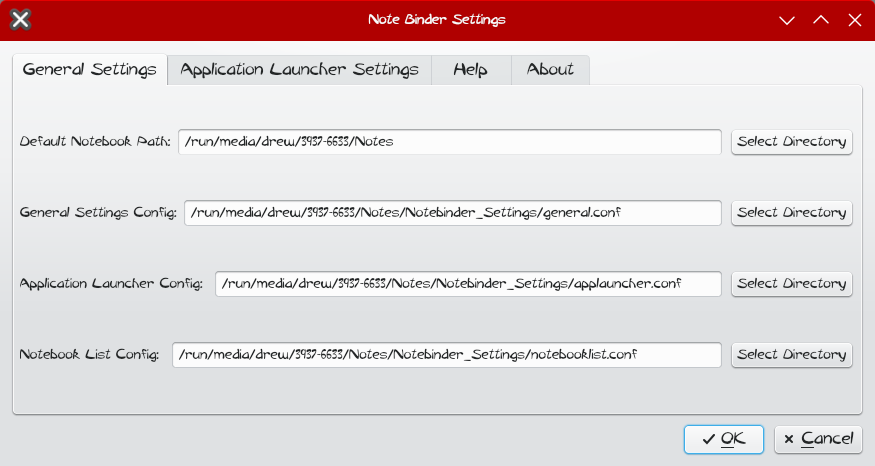
Here is how to change these:
3.5.1) Default Notebook Location
The Default Notebook Location is the default directory where the notebooks can be saved (though they can be stored in any valid directory on the computer). When clicking "Open Notebooks" the first directory that shows up in the file dialog is the directory entered in this field. This setting only works currently with "Open Notebooks" function and isn't relevant if the user intends to create Notebooks in different Directories.
3.5.2) General Settings Config File
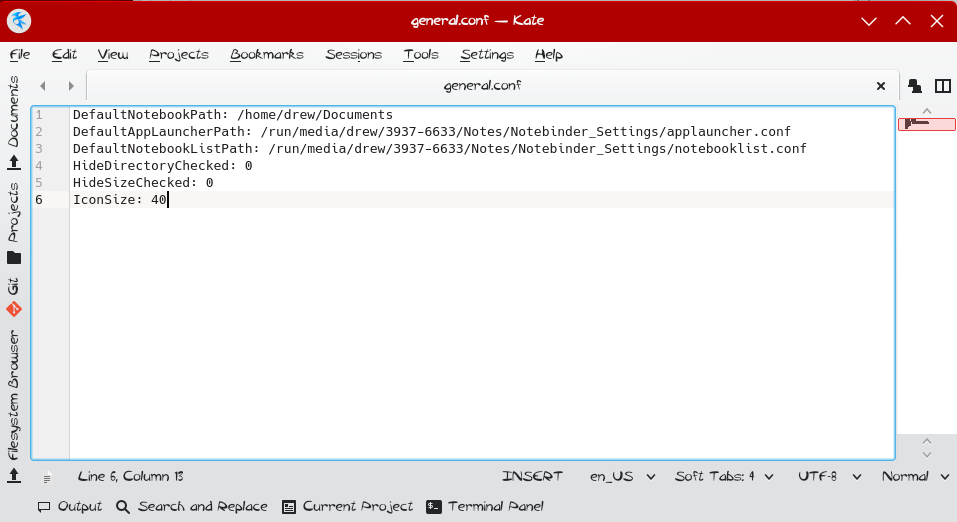
The General Settings of this application are stored in a configuration file to be reloaded upon application reboot. Contains information such as Icon Size, Hide/Show Directory and File Size information on the Notebook List and where other configuration files are stored. The file path information of this configuration file is inside a fixed $HOME/.config/settings.conf where the file contains where the General Settings configuration file is at.
3.5.3) Application Launcher Config File
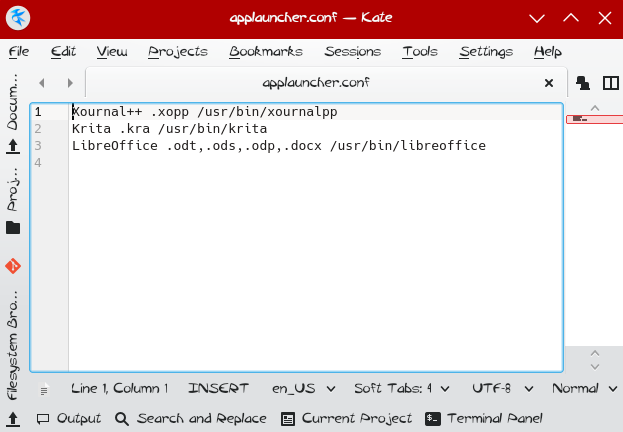
The Application Launcher information is stored in a configuration file to be reloaded upon application reboot. Contains A List of Application with information such as Application Name, Application Extensions (separated by a comma) and Application Executable Location. The location of this file is information stored in the General Settings configuration file. Applications can be added and removed through here and restarting the program but that is not recommended compared to doing it within the program.
3.5.4) Opened Notebook List Config File
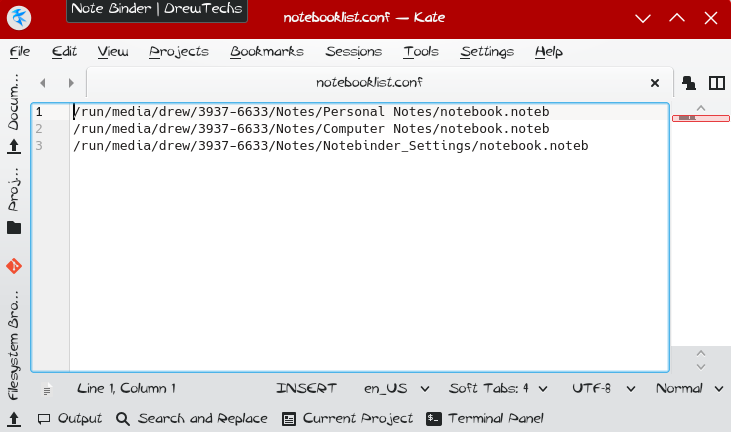
This application saves information on what notebooks were opened so that the Notebooks can be opened upon application restart if the notebooks still exist (if the notebooks are deleted before restarting the program then it will not be opened). Essentially it saves the previous session over so the user can continue where they left off.
3.5.5) Default Config File
The default configuration file is located in $HOME/.config/notebinder and should not be changed or modified (unless the user knows what they are doing). If the file is removed and the program restarts, a new set of configuration files will be created. This file only contains the directory where the General Settings config file is located.
3.6) Application Launchers Functions
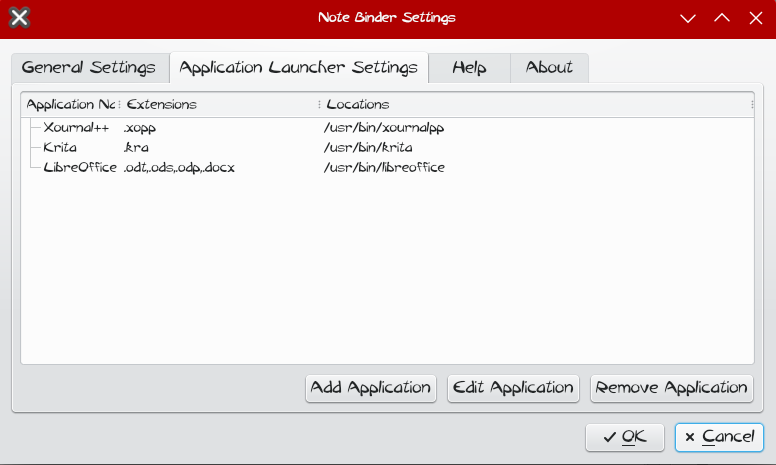
Application Launchers are a very important component to this program, without Application Launchers the Notebinder cannot open Sections nor open applications to create any new ones. So for any user it's highly recommended to add some applications. To get to the settings for Application Launcher click on the Settings button and go to Application Launcher Settings tab.
3.6.1) Add Application Launcher
To add (create) a new Application Launcher, click on the Add Application button and a dialog will show up.
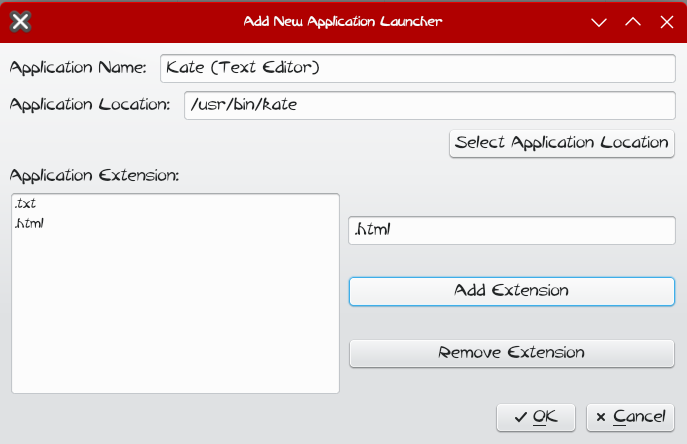
Enter the Application Name and find the Application Location. Then enter the file extensions for the application launcher to support. To add extensions, enter the "." and then the extension type next to it and then click Add Extension, so txt files will be ".txt". Extensions can also be removed by selecting the extension from the list and removing it. When done, click Okay and a new entry will be shown on the list of Application Launchers.
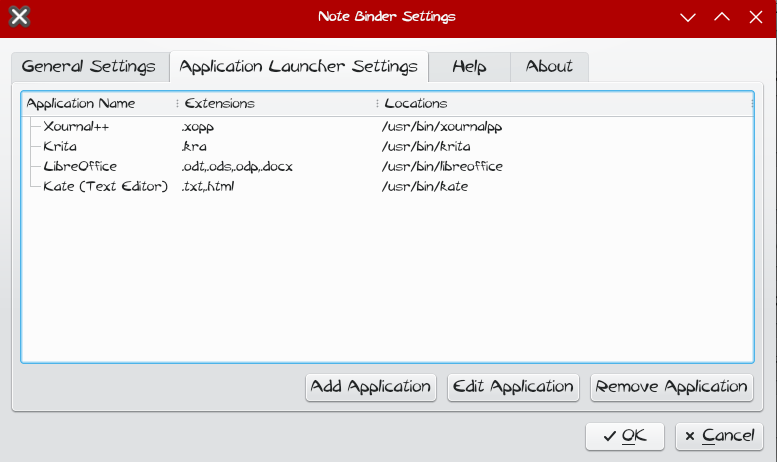
3.6.2) Edit Application Launcher
To edit an existing Application Launcher, select the Application Launcher on the list to edit and then click on the Edit Application button and a dialog will show up.
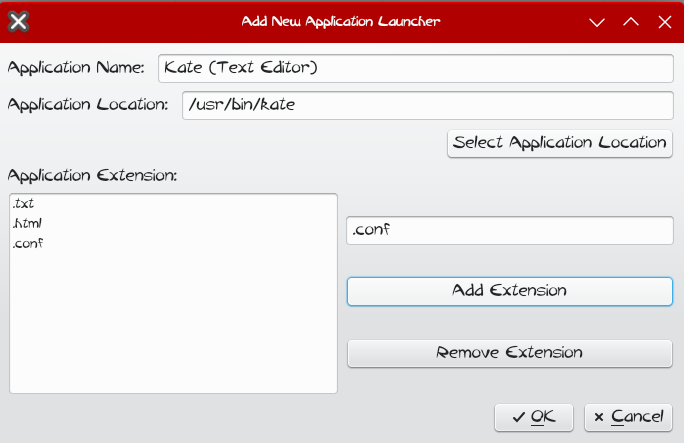
From here the application launcher can be edited. After making changes, click okay and the application launcher will be updated
3.6.3) Remove Application Launcher
To remove an existing Application Launcher, select the Application Launcher on the list to remove and then click on the Remove Application button and the Application Launcher will be removed.
4) Issues
Currently there are a few issues within the program that have not been fixed/patched yet, most are minor issues but some are bigger issues.
Application crashing on Startup (via X.Org).

When running this application through X.Org, the application crashes. Currently I haven't found a fix for it yet though I hope to find it at some point since this is an important issue. This application works through QtCreator and it works under the Wayland compositor so it's unclear if this is a NoteBinder program issue or a X.Org issue, more likely NoteBinder since most other Qt software works fine under X.Org.
Duplicate Items
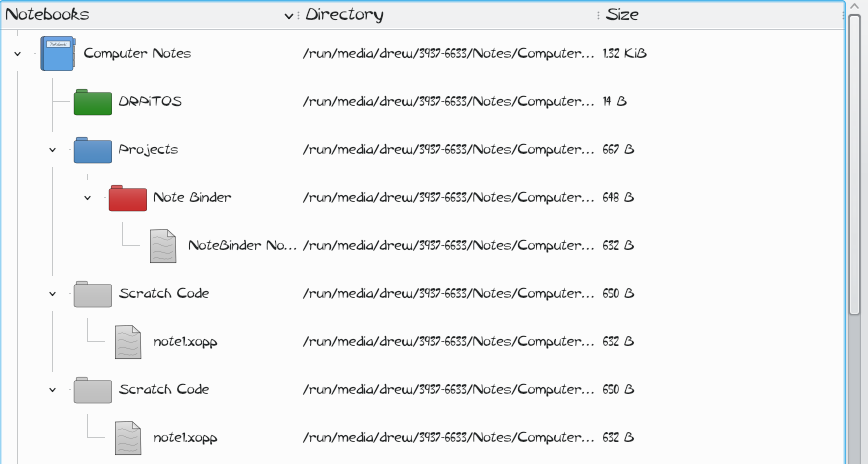
If an item in a Notebook (or even Section Group) is copied or moved into a different Notebook or Section Group but the different Notebook/Section Group already contains an item with the same name, a duplicate ends up being created on the Notebook List (in the UI, within the code there is only one copy, which can cause instability and crash the program if the Notebook List is modified after this issue rises up) despite there being only one copy of the file and directory (the newer version overwriting the older version). This can be a problem as it can crash the program if it's being managed. There are two ways around this, one is to simply reboot the program and the problem will disappear and only one item with that name and path shows up. Another solution is deleting the second element and both items will be gone, but in doing so will delete the Section/Section Group so the first option is better for keeping those notes.
Application Crash via Endless Recursion
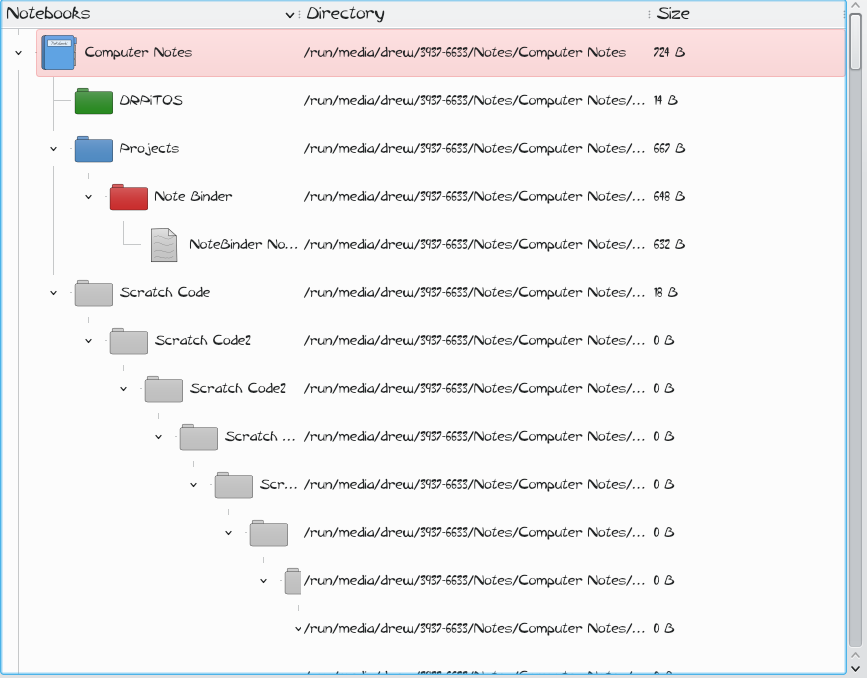
If a Section Group is copied into itself, the Section Group is recursively copied into itself indefinitely, creating a endless loop until the program crashes, then upon reboot you can see the same Section Group inside a Section Group inside a Section Group and so on. The program cannot be restart until the recurring directory is deleted so a file manager will be highly recommended to fix the problem (or a rmdir command). And even when deleted, when the program starts up you can see the endless recurring directory item. Delete it from the Notebook list after deleting the folders from the computer and the problem will be fixed (except those directories appear in the New Section/SectionGroup/Notebook dialogs so restart the program after and things can resume normally. To delete it through the Notebook List could crash the program as well so it's recommended once this problem is encountered to use a file manager to remove this recurring directory.
NOTE: If a Section Group is moved into itself, it slows the program down but the Section Group ends up being deleted and no longer exists.
5) Conclusion
My goal of this project was for me to create a note organizing program that could complement existing note taking applications. The end result was this application and while there are still bugs that are needed to be fixed it's proven to be a super effective tool in organizing my notes. While I doubt this is the best note organizing program it works really well for me as my main note organizing application for the time being. I took inspiration from a famous note taking application called Microsoft OneNote since that note taker also has the ability to organize application and also organized them as Notebooks, Sections and Section Groups and even gave similar colored icons as well. Prior to using Linux as my main OS that was my main note taking application and I yet to see a good substitute for it.
I may consider taking requests as well as doing some bug fixes sometime in the future but not yet since it took me weeks of nearly non-stop coding to put this together. As for my UI design, it is very redundant that I have all those buttons on the side and a toolbar, could have been done without one of them but I was unsure which should be removed.
6) Source Code
The Source Code is at: https://gitea.drewtechs.net/DrewTechs/Notebinder/
NOTE: To compile it, run qmake and then make -j N (N=CPU Threads, to increase spead of compilation).
Sections


Recent Posts
March 8, 2024: At last, the website has returned!
March 12, 2022: Note Binder - Note Organization Application: https://drewtechs.net/projects/note-binder
January 30, 2022: Updated Website with a new Web Server Setup.
October 15, 2021: Added Gitea to the Website to self-host source code: gitea.drewtechs.site
July 31, 2021: Project: Raspberry Pi Pico RTOS (DRPiTOS) Initial Design
June 1, 2021: Mini-Project: Portable Bluray Player
March 31, 2021: Added a Product Review for the Dell XPS 15 9575 w/Vega M
